
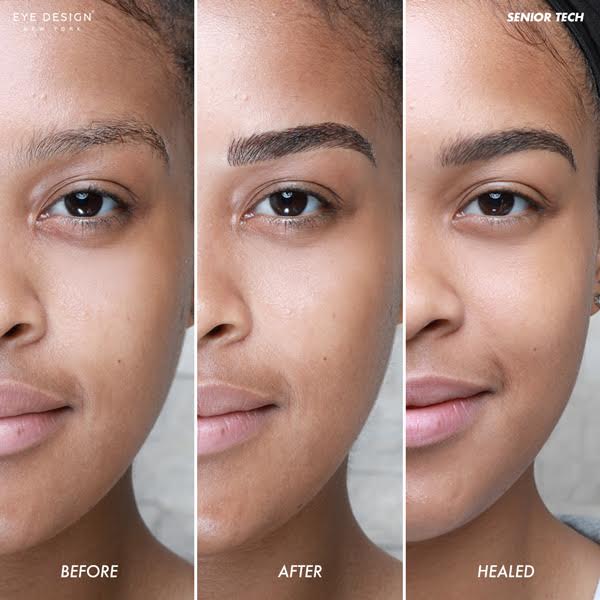
Healed Ombre Brows; A few months ago, I wrote about my experience getting ombre brows done , and I’ve had such a positive response from it that I wanted to share an updated look at my brows. The pictures above show the difference between my brows before the appointment and after about 6 weeks of healing. When I first went to have them done, I was told that within a week or two, they would start to fade and look more natural; this is absolutely true, because within just a few days, they had gotten a lot lighter. Even if you can’t see in the picture, there is a gradual lightening effect that happens as they heal.
I’m really happy with how they’ve turned out—they’re still very dark where they were originally dyed black, but now it’s graduated down to a nice brown color, which is definitely much more natural looking than when they were solid black. If you’re considering getting ombre brows done, I highly recommend them! My only disappointment with this particular experience is that the lady who did them didn’t take the time to talk me through some of her recommendations for aftercare—I thought she would give me some tips on how to care for them so that they would heal nicely and last longer,
I’ve been getting my eyebrows tinted for almost a year now. At first it was just every month, but after a while I noticed that I kept getting them done more and more often: every two weeks, then every week, then twice in one week, then three times in one week… you get the idea. I finally realized that the reason I kept going back was because I wasn’t happy with how the tint faded—and if I wanted to keep my brows a pretty grey-ish brown shade, it had to be re-tinted within a few days of the last application. This meant that my eyebrows were constantly patchy and spotty from being freshly dyed and not yet healed from the last time.
When I discovered this trend, I immediately stopped getting my brows tinted so frequently—I figured it made sense to give my hair some time to grow out instead of having to start over every time they started looking good again. However, even though I let them grow out before going back for another tint session, there was still something wrong with how they turned out: the color was inconsistent. The middle part of my right eyebrow would be noticeably darker than the left side. In fact, as far as ombre brows go,
Achieving a natural-looking ombre can be tricky, and even if you’re adept at creating the perfect blend of colors, the time it takes to get there can be a little daunting. If you decide to take the plunge, though, here’s a step-by-step breakdown of what you’ll need to do to make your dream brows come true.
First, find a picture of an ombre look that you like and use it as inspiration for your own brows. Take note of the following:
- The color progression from dark to light
- The shape of each individual brow (if it looks very different from yours)
- The thickness of each individual brow
- The length of the arch (the part above your eye that extends toward the tip of your nose) and how it compares to yours
Next, gather your tools. You’ll need:
Now that you have all the materials ready, you’re ready to get started. First, apply the darkest color in whatever shape is closest to what you want. For example, if you want a thinner tail toward the outer edge of your nose but thicker at the inner part under your arch, use small strokes on either side of where your arch
While I love the look of ombre hair, I never thought it would be a possibility for my brows. I have spent years trying to grow out my overplucked teen brows, but then decided to give in and let them continue to grow while they serve their purpose. That purpose? To frame my eyes even when they aren’t made up. However, I was really itching to try the ombre look on someone and decided that my own eyebrows were the most likely candidate.
Ombre hair is a popular trend for hair color, but it’s also been used in brows by some who want to achieve a look that is softer and more natural. It’s a great way to soften angular features, but it can be difficult to maintain—especially if you’re trying to grow out darker roots and lighter ends. If you have naturally dark eyebrows, the contrast between your natural eyebrow color and the dyed part of your brows can be not only noticeable but also unflattering. The ideal ombre brow would start as close to your natural color as possible, so that the change isn’t so drastic (and therefore easier to grow out).
In order to achieve this look, some people have been bleaching their naturally dark eyebrows in order to get rid of some of the darkness, then dyeing them with one or two shades lighter than their natural color. But it can be difficult to achieve the right shade and tone for your face, depending on how light or dark your natural eyebrows are.
The best way I’ve found to do this is by using semi-permanent dye over microblading. Microblading is an art technique that specializes in creating incredibly realistic strokes with permanent ink (the ink will last anywhere from 1-5 years depending
Eyebrows are usually the first place to start when it comes to makeup—but they can also be the last. It’s common for women who color their hair to stop touching up their roots once they get a good ombre effect, but even if you regularly color your hair, you might find that your brows are not quite matching. This is especially true if the colors of your hair and eyebrows are naturally different, which is quite common with people who dye their hair blonde or red—there’s an easy fix.
First, select a nice deep red (I used Manic Panic in Vampire Red) and apply that color to the part of the brow closest to your nose. The goal here is to have your brows match your roots as closely as possible without actually having them match. You’ll notice that there will be a large discrepancy between the root and tip sections of your eyebrow: good! The next step is to use a dark brown (I used Colours by Ben Nye in Dark Brown) and fill in all of the rest of the places where the wild red dye didn’t touch. By using colors that are opposite each other on the colour wheel, you’ll have created a very natural-looking ombre effect, and now your eyebrows will
Regardless of the technique used, brows are often the most delicate feature to work with when attempting an ombre. It’s consequently important to be as precise and gentle as possible.
If you’re using a tint, it will be ideal to use a color that is very similar to your natural hair color. However, if you want a deeper hue, feel free to choose a shade two or three shades darker than your natural color. The pencil should match close enough that there is no visible demarcation between the two shades, but not so close that the color looks unnatural in appearance.
When applying the tinted pencil, always start at the beginning of your brow and work your way towards the end. This will ensure that you’re properly blending and smoothing out any harsh lines of color as you go along.
When using powder on your brows, remember: less is more! You can increase intensity by layering multiple lighter layers of powder over each other instead of trying to achieve depth all at once. The key to nailing this look is precision—make sure you work with small strokes and don’t go beyond the outline of where your brow begins and ends.
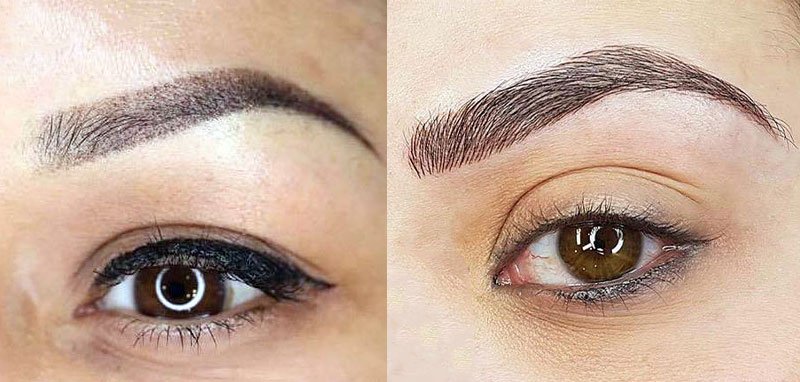
How do You Know Your Ombré Brows Are Healed?
Ombré brows are all the rage, but a darker hue on your upper brow and a lighter one on your lower may not be as easy to achieve as you may think. The standard advice is to wait until the brows have fully healed before continuing on with any sort of cosmetic procedure. But how do you know when they’re done healing? Some people believe that the best way to tell if your brows are ready for the next step is to check the scabbing stage. Scabs are what form over the area where you’ve had work done, and they’re typically gone within two weeks after the procedure. However, if you have ombré brows, there may be no visible scabs at all—in which case, waiting until there are is not a good idea. You need to be able to see what’s happening underneath your skin in order to determine whether or not it’s safe for you to continue with any more work. If your ombré brows haven’t been stitched up yet, you can use tweezers (most aestheticians use stainless steel ones) to pull back each layer of skin very gently and inspect what’s beneath it. If there’s still bleeding (the scabs will eventually fill in), it
Is the top of your eyebrow pink? Does it feel like a sunburn? Does it feel raw and tender, like your skin is about to peel? If any of these are true for you, then congratulations—your ombré brows are healed.
If your brows feel sore but not red or pink, that’s a good sign, too. The feeling should be similar to the feeling on the top of your hand after you’ve held it in the stream of a scalding shower for too long. It’s not necessarily painful, but it’s uncomfortably warm and prickly.
You’ll also know they’re healed if there’s no more crusty residue on your comb or brow brush when you go to groom them. This is especially important, because if you’re still picking off scabs, that means they’re not fully healed yet and it could take longer for them to get better. If you still have crusted bits stuck on there, give them another few days.Healed Ombre BrowsHealed Ombre BrowsHealed Ombre BrowsHealed Ombre Brows
Ombré brows are the most common color technique in salon services today, and they can be achieved at home with a few products from your local drugstore or beauty supply store. You should allow at least six to eight weeks for your hair to grow out and for your new growth to match the length of your old growth before attempting to get your ombré brows done at a salon. At-home brow dyeing kits such as Dipbrow Pomade by Anastasia Beverly Hills and WunderBrow by Benefit Cosmetics are safe to use before you come in for an appointment with a professional.
A good rule of thumb is that you’re probably ready when the new growth matches the length of the rest of your eyebrows, but there’s more than one way to tell if you’re healed.
While ombré brows are a bold choice for your face, they involve prepping the skin with a chemical that needs to be applied by a licensed professional. The procedure is best done as part of a series, as the color builds up over time. In between each session, you want to check to make sure your skin is healing properly and thoroughly. Because the hair was permanently removed by electrolysis, it’s important to know that your brows will keep growing out—and so they’ll keep looking darker than they will once they’ve been filled in with color. After all, no one wants a drastic change to their look right after the work’s been done. Here’s how to tell when it’s safe to start coloring in your brows:
The first thing to watch for is that your skin has fully healed—you’ll see this when there’s no longer any redness or irritation around the area where the hair was removed. Sometimes this can take up to 6 weeks after the procedure, so be patient. You may also notice some excess peeling or flaking in the area: if you do, just wait for this to go away before you get started with filling them in.
To check for signs of new growth (which should be about 1/ Healed Ombre BrowsHealed Ombre Brows
As we know, ombré brows are in (thanks to the Kardashians’ influence). However, for some of us, it may be too dark to leave them like this. So here is a guide on how to heal your brows so that you can lighten them up without going all the way back to the beginning and having to start over. I should note that this is only a guide on what has worked for me, and everyone’s skin is different. Some steps you might have to add or change. But here goes:
When you’re dyeing your hair at home, it’s important to follow the instructions to make sure the process goes well. It’s the same when you’re getting your eyebrows dyed professionally, as well as with a DIY technique—it’s important to know how to check for the proper color development and cure.
If you’ve gone to a salon for your brows, often they’ll warn you about checking for color development and cure by looking in a mirror against natural light or in front of a window. This is because if the dye is not fully set, it can appear muddy or greenish in unnatural lighting, which would really throw off the results! If you’re dying your brows yourself, however, there are ways to tell that the color has developed correctly and is ready to be cured.
The key thing to look for when checking your eyebrows is determining whether or not they’ve reached “steady state”—or if all of the color has sunk into the hairs. When they haven’t reached steady state, they’ll have a build up of excess product on particular parts of each strand of hair, which can look very obvious in natural light. For example, if you were only supposed to let them sit for 15 minutes but went longer than that before rinsing
How Long Does Ombré Brows Take to Heal?
Healing process for ombré brows takes between 5-10 days. During the first 3 days, the brows will appear more intense and darker than they will be in the end.
It’s been two days since I got my eyebrows done, and they look amazing! There is slight redness around the eyebrows and a few scabs, but no pain.
I’d like to know how long it will take for them to completely heal.
It will take about 5 to 7 days for the skin to settle and for you to see the true color. It is normal for your eyebrows to appear darker and bolder in the beginning and then gradually get lighter. Your eyebrows will reach their final result after about 30 days.
After healing, you will need to follow a proper aftercare protocol in order to achieve your desired results and to avoid any complications or risks during the entire healing process. It is very important that you follow these instructions carefully:
On the day of your treatment, do not wet your brows or apply any products on them.
After 24 hours, gently wash your eyebrows with lukewarm water without using any soap or cleanser/makeup remover. Pat dry with a clean paper towel. Do this twice daily.
Gently apply a thin layer of aftercare ointment (provided by us) with a cotton swab onto your eyebrows 3-4 times a day for 7 days after your treatment. (After one week, continue to apply once daily until healed). You can use Vaseline or A&D Ointment as an alternative if needed.
Do not wear makeup for at least 10 days following your treatment. Make sure that makeup does not touch eyebrow area as it
The healing process can take anywhere from seven to 14 days. While brows may look healed, they are not and can be easily damaged by water and sun exposure.
During the first seven days, keep your brows dry with the ointment provided. Apply a thin layer of ointment three to five times per day (or as needed) to help with itching and flaking. Do not use aquaphor, neosporin or vaseline. They will cause the pigment to fade faster and your brows to heal patchy.
Avoid exercise and sweating for the first two weeks to allow proper healing. If you must work out, apply a very thin layer of ointment beforehand. You must also avoid steam or sauna for the first two weeks so that your pores do not open up allowing sweat, dirt and bacteria into them. This could lead to infection or fading of the pigment.
Avoid getting any product on your brows including hair products, creams or lotions for at least one week after procedure (no eyebrow makeup).
Avoid direct sun exposure on your eyebrows for at least 4 weeks after procedure. Keep sunscreen away from treated area for at least 4 weeks as it will cause fading of the pigment. After 4 weeks you can apply
The process is quick and painless, but the recovery is a different story.
The healing process can take anywhere from two weeks to one month, so you’ll want to keep that in mind if you’re planning your first microblading session around an important event, like a wedding or a big vacation. And while the healing period can be a nuisance, it’s for the best.
During this time, new skin will grow over the area where hair was bladed and the color will settle into place in your brows. Most of this time period is simply spent waiting for color to fade slowly. The end result will be worth it, though: gorgeous, natural-looking eyebrows that are perfect for filling in with makeup or just wearing au naturale.
Microblading and Microshading takes about 2 weeks to heal. Once healed, there is no need for any maintenance work for at least 6 months.
Microblading and Microshading can be performed on anyone over the age of 18 who is looking to improve or enhance the look of their eyebrows. However, there are some exceptions. A good candidate is:
•someone that has enough hair on their eyebrows. If your eyebrows are very sparse, you may want to consider a more traditional tattooing method as Microblading and Microshading are semi-permanent solutions and will only fill in the existing brow hair you have.
•someone with normal/dry skin. Oily skin tends to cause the pigment to fade faster because the oil pushes it out sooner than it would if you had normal/dry skin
•someone that wants to change their eyebrow shape or fill in gaps within their brows
The healing time is around 2 weeks.There can be some redness and swelling after the treatment, but this will soon fade.