Drawing hair is a lot like drawing any other body part. It’s all about observation and practice. If you have trouble figuring out how to draw hair, try looking at photos of people with different types of hairstyles. Keep in mind that some hairstyles are easier to draw than others, so don’t get discouraged if you don’t get it right the first time. Here are some basic tips for drawing hair:
Hair is usually made up of strands or strands of strands, so make sure your lines are consistent and smooth. Use long strokes for thick strands and short strokes for thin strands.
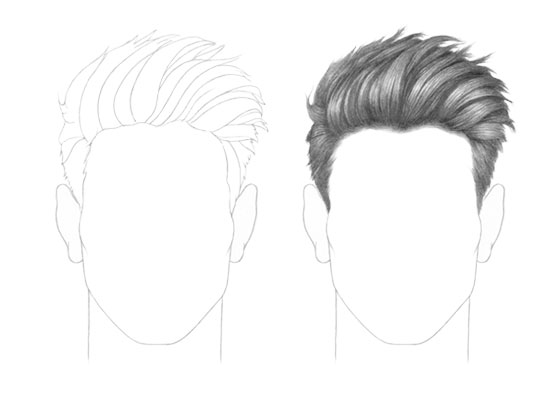
Be careful when drawing bangs, which can obstruct the face if drawn incorrectly. To avoid this problem, try making bangs part of an oval or circle shape that connects with the head (see below).
Drawing Hair Tips
When drawing hair, it’s important to keep in mind that it’s made up of several layers and is a very complex structure.
The hair on the head is made up of three layers: the cuticle, cortex and medulla. The cuticle is the outer layer that protects the hair from damage, while the cortex is the inner layer that gives strength and resilience to the strand. The medulla is the center of each strand and it contains sap (a waxy material) which helps waterproof the hair strand.
Drawing Hair Step by Step
Begin with a simple circle shape for your subject’s head, then draw two parallel lines above and below this circle to form guidelines for your character’s brows. Next, draw another circle to represent where you want your subject’s eyes to be located on their face. Then draw another circle at a 45-degree angle away from one side of this first circle (this will become your character’s nose). Draw a curved line between these two circles to form an eyebrow shape similar to what you see above (note how we’ve drawn our example). Next, draw lines extending from this eyebrow shape down toward their mouth area (these will become their lips). Finally, draw some small curved lines within these areas as well as
How do you draw Gacha life?
Gacha Life is a freemium mobile game developed by Gacha Life Limited and published by Line Corporation. The game was released for iOS and Android devices on April 2, 2017.
The gameplay consists of players collecting gachas (figurines) that represent characters from the series, and then using them to create a team of six characters. These characters can be used to battle other players or complete quests.
There are two types of gachas; premium and regular. Premium gachas are more powerful than regular ones but they cost more in-game currency (lives) to draw them.
Gacha life is a game where you can dress up your avatar, choose a career and buy items to decorate your room. The game also has a story mode where you can read comics and play mini games.
The first thing you need to do is download the app from the app store or play store. Once it’s downloaded open it and follow the instructions on screen. Once you’ve opened the game for the first time you’ll be asked to create an avatar, this can be done by tapping on the plus button at the bottom left hand side of your screen, then tapping on ‘Create’. You’ll be taken to another screen where you can choose from one of three hair styles and skin tones for your avatar. The next step is choosing your clothing style, there are many different choices so pick one that suits you best!
If you want to join a club then go back into ‘Create’ by tapping on ‘You’ and then select ‘Clubs’. Once at clubs select one of them by clicking on one of their logos, once done click ‘Join’. Now comes the hard part – choosing what club to join! If you’re unsure which one is best then look through each club’s description until you find one that sounds interesting. You will also see
How do you shade Gacha hair Ibis?

You can shade Gacha hair Ibis in a variety of ways.
Here’s how I do it:
- Apply a light brown and a darker brown color to separate strands of hair.
- Use a small paintbrush (or an eyeliner brush) to paint the lighter color over the darker color. The result should be an ombre effect that fades from dark to light, just like natural hair does.
I’ve been a Gacha hair fan for quite a while now and I think it’s the best way to get hair. It’s so easy to dye, style and take care of.
However, there is one thing I’ve never been able to figure out: how do you shade Gacha hair?
I’m not talking about the fact that you can’t make it lighter or darker, but more about adding dimension to it. It seems that no matter what color I use on my Ibis, it always looks flat and boring.
In this tutorial I’ll give you some tips on how I shade my Ibis and hopefully help you guys with your own shading projects!
How do you shade eyes?
When you’re shading eyes, the goal is to create depth and dimension. It’s an easy way to make your eyes look more alive and realistic.
There are several different ways to shade eyes. You can use pencils or brushes and even watercolor paints!
The traditional way of shading eyes is to use pencils. Apply a light layer of color at the base of the eyelid, then blend outwards with a clean brush or cotton swab dipped in rubbing alcohol. For more information on how to use pencils for eye shading, check out our article on How To Shade Eyes With Pencils.
Another option is to use watercolor paint! This method works best if you have access to a large palette knife or spatula because you’ll need something to spread out your paint evenly across the eyelid before blending it out with a clean brush or cotton swab dipped in rubbing alcohol.
If you want something even easier than pencils and paints, there are plenty of products available that will give your eyes that natural-looking hue without any effort at all! Check out our article on How To Shade Your Eyeshadow for more details about these products and tips for applying them properly so that they look as good as possible!
It’s easy to find the right color for your eyeshadow. The first step is to figure out which eye color you have. There are three main types of eyes:
Blue eyes. If you have blue eyes, you probably know that they’re not actually blue — they’re more of a grayish color with hints of green or hazel. A lot of women are afraid of using dark colors on their lids because they think they’ll look harsh and unnatural. But that’s not true at all! Using dark shades under your brow bone will make your eyes look bigger and brighter, while adding a bit of color to your lower lash line can make them appear larger as well.
Brown Eyes. Brown-eyed beauties are lucky because there are so many ways to do your makeup! For starters, brown eyes are neutral in color and so can be paired with any shade or combination of shades without looking strange (although it’s still important to choose ones that complement each other). You don’t need much more than a light shade on the lid, some definition along the lash line and maybe a bit of mascara — unless you want an extra pop of color, in which case go ahead and add some vibrant shadows into the mix!
How do you color anime hair?

How do you color anime hair?
This is a question that comes up a lot in the cosplay community. Anime hair can be very important to your character’s look, but it can also be difficult to get right. The main problem is that anime hair often has highlights, lowlights and other techniques that aren’t easy to replicate with real-life products.
In this post, I’ll share some of my favorite tips for coloring anime hair.
Anime Hair Colors
For this tutorial, I’m going to use an example character: Rei Ayanami from Evangelion! She has purple hair with pink and blue highlights, so let’s see how we can create that using our trusty box of crayola crayons.
If you’re looking for a tutorial on how to color anime hair, this is the article for you!
The first thing you need to know is that coloring hair is a lot more complex than just putting color on an image. There are actually several steps involved in coloring anime hair, and each one affects the final result.
In this article, I’ll show you how to color anime hair by using Photoshop. You can use other programs, but Photoshop has some great tools that make it easy to get professional results.
If you’re just starting out with digital painting and want more practice with colors and shading techniques, then this article will be helpful too. It’s not just about coloring anime hair — it’s also about getting familiar with color theory and shading techniques that will help you improve your overall drawing skills
How do I draw curly hair?

I can’t draw curly hair at all. I have no idea how to do it, but here’s a tutorial on how to draw curly hair.
It’s not that hard when you get the hang of it. Curly hair is just like straight hair, only easier because you don’t have to worry about the direction of each strand.
Step 1: Draw a circle for the head, and another circle for the neck. The top of the head should be slightly wider than the bottom.
Step 2: Draw a third circle inside the first two, but make sure it doesn’t touch them at all (it should be smaller). This will be your guide for drawing all your curls!
Step 3: Add some squiggles inside this third circle that go from one side to the other (or from top to bottom). These are your guide lines for where each curl will go.
Step 4: Draw some squiggles along these guide lines that run across them, crossing over themselves as many times as you want (this will help determine how tight or loose each curl is). You can draw these squiggles in any direction; just make sure they’re going across your guide lines evenly.
Step 5: Choose one of those squiggles that crosses
Drawing curly hair is a little more difficult than straight hair. The main reason is that it’s very difficult to draw curves with a straight line.
Curly hair is not just one curve, but many. It has different shapes and forms, and if you try to draw it all with one line, you’ll end up with something that looks like this:
The problem with this shape is that it doesn’t look natural at all. It’s impossible for hair to be shaped like this because we don’t use straight lines when styling our hair. Instead we use curling irons, blow dryers and other items that create curls which are not perfectly round in shape.
So how do we solve this problem? First of all let me tell you something about my drawing experience with curly hair: I used to struggle so much with drawing it that I almost gave up on drawing altogether! But then I found out a few tricks which helped me tremendously! And now I can draw curly hair with ease!
One thing you need to know before starting drawing curly hair is that it needs different tools than straight or wavy hair does! If you want your drawings to look real, then